Category: D365FO

MSDyn365FO: Filter planned orders by pegging details

I have been asked many times whether its possible to filter planned orders by pegging details, typical example is there is a large order coming for make-to-order items and planners would like to group and process them together. Another common ask is to be able to process separately orders that are pegged to open sales orders, and then to safety stock and then to forecast.

In Dynamics 365 for Supply Chain Management on the Master planning workspace we have an inquiry that shows planned orders delaying sales, safety stock and forecast. But what if I just want to review the list of all orders that are pegged to open sales orders regardless of whether they are being delayed?

The answer is – use Advanced filter. Great feature which allows to apply complex filters of various complexity to your data source and its available on almost every form in the system.

So how can I filter planned production orders by sales order number? Here is how to do it:

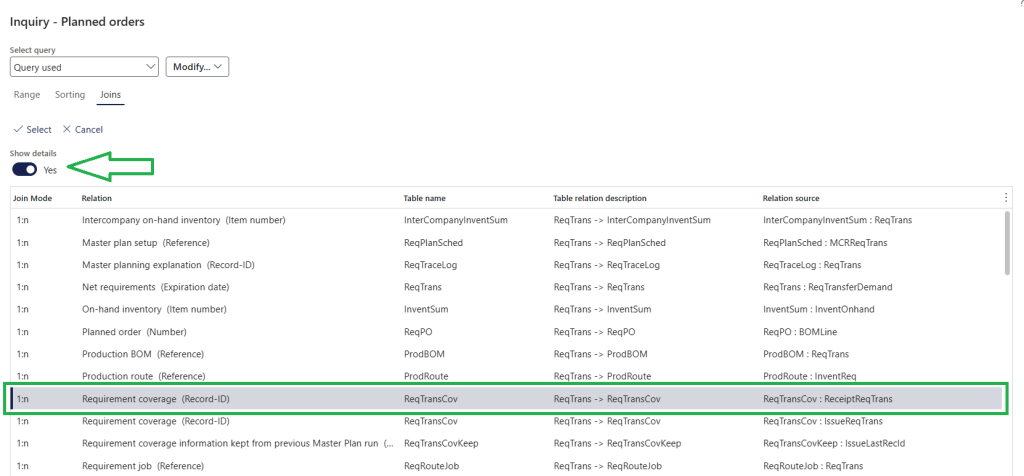
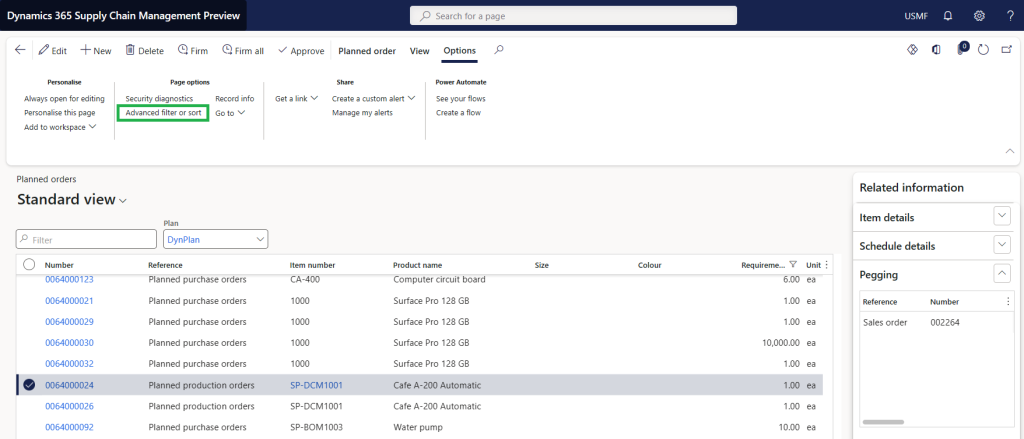
Go to Master planning > Master planning > Planned orders, and use advanced filter option on the action pane:

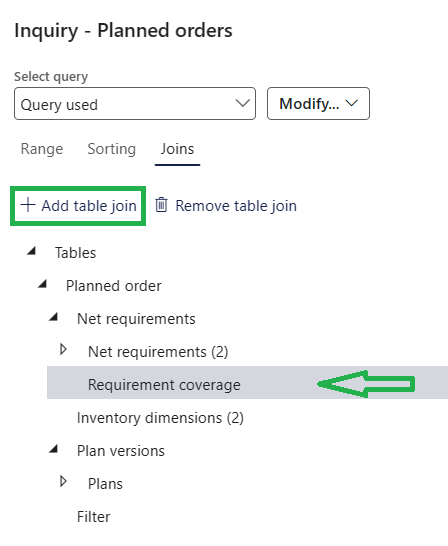
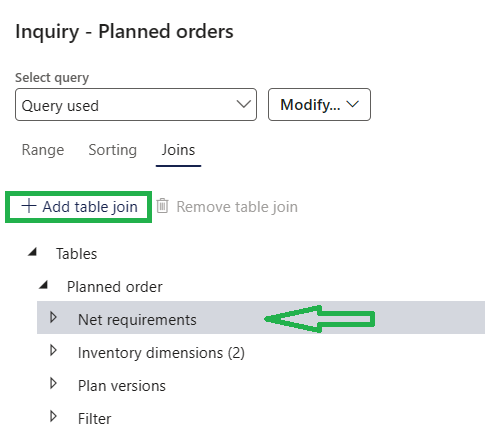
Go to the Joins tab and join Requirement coverage table to the Net requirements table like this:

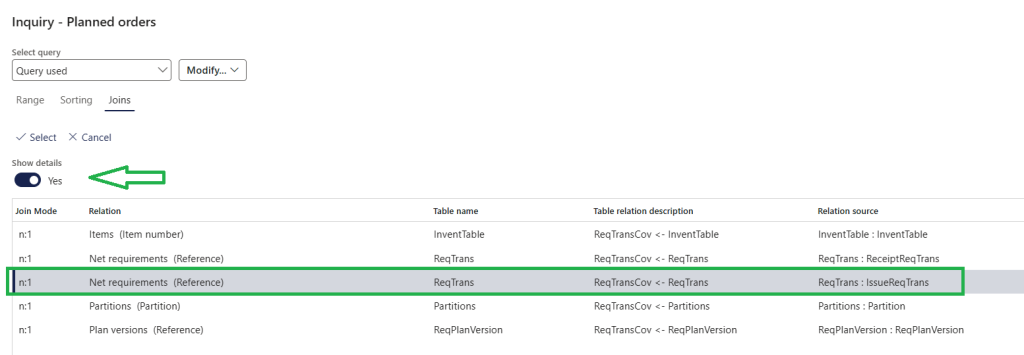
After this, join Net requirements again to recently added Requirement coverage like this:

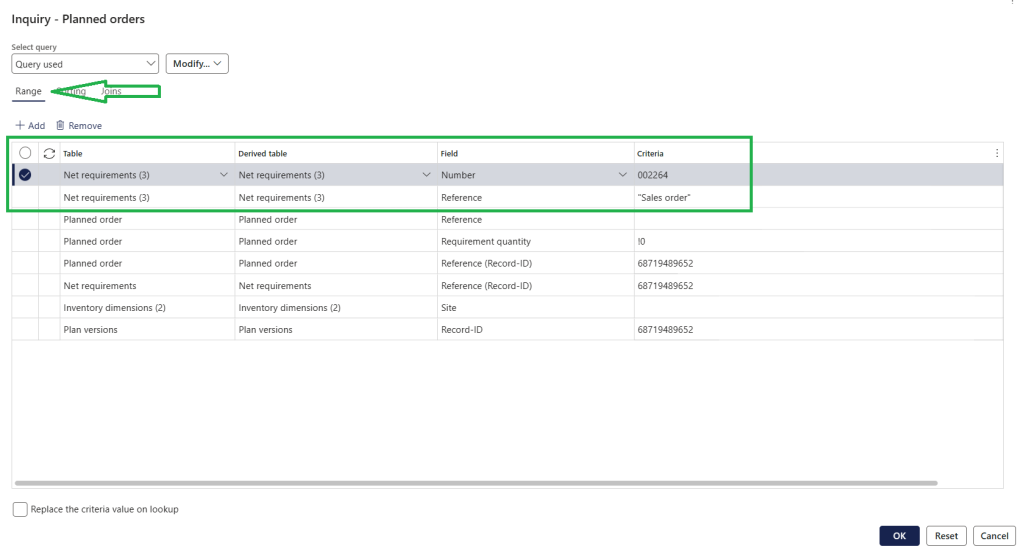
Once done, to filter by pegging info use Net requirements (3) to apply filter by Reference (in example below Sales order) and Number (Sales order number).

Result gives:

That’s it! And if you just want to see orders pegged to sales or safety stock etc. just adjust the query to contain only reference value.

MSDyn365FO: Print Product label to a ZPL printer from a PowerApp

While ago I have posted a series of blogs that describe how to create a PowerApp that generates product labels. This app was embedded into Microsoft Dynamics 365 for Finance and Operations, it allowed to generate label with a barcode and open it as a pdf file in separate tab. In this solution I used ZPL language for label design and Microsoft Power Automate (MS Flow) to retrieve product specific data from MSDyn365FO. If you like to know more about this solution, then start reading from this post.

Because PowerApps and Microsoft Power Automate do not support printing, we could print our label only via browser print option and could not redirect the label to a ZPL printer. There are some blogs on the web that show you how to solve this issue, for example, you could save a file to One drive folder and have PowerShell script or external app that monitors this folder and prints files from it. However, none of the options I saw was perfect.

Therefore, I have got an idea to use Document routing agent for printing. We already know that it is capable to print ZPL labels, because we use it in Advanced warehouse management. The only gotcha here, is that there is no out of the box entity to add records into a printing queue. Kudos to a colleague of mine, Ievgen Miroshnikov, who helped me out to implement this solution. You can find it on a GitHub here, and in this post, I will create an example that shows you how to use it.

To test my solution, I will setup a dummy printer. To do it, follow Step 2 from this blog.

Then I have installed Document routing agent and enabled my printer in MSDyn365FO:

PowerAppPrint_Network printers

Considering that I created original app while ago, I no longer had that version, and I had to recreate it from the scratch. Therefore, I have used it as an opportunity to change and enhance it a bit. Below you can see what was modified:

  1. I have created parameters form that stores ZPL label design, this is to have one place to store the layout (ZPLLabelLayout field below that stores ZPL label text):PowerAppPrint_ParametersScreen
  2. I have added Layout button to the Main form (it opens Parameters screen where you can setup layout). Also, I have changed preview Image property to refer to ZPLLabelLayout field created above (previously I had here hardcoded ZPL label text):PowerAppPrint_MainScreen
  3. Finally, I have added print button that uses Microsoft Power Automate to trigger print action. On select I have specified my flow and passed ZPLLabelLayout field value to it:PowerAppPrint_PrintButton

These are all the changes from PowerApp side. Let’s have a look at the created flow. We have two steps in the flow, one is a trigger another one is an action:

PowerAppPrint_ExecuteActionFlow

For the action step we need to specify following parameters:

  • Instance – link to MSDyn365FO instance
  • Action – data entity that was exposed to submit records to document routing agent queue
  • _printerName – Printer name from MSDyn365FO (note, I have hardcoded it, but you can retrieve all printers available from MSDyn365FO and add an option to select it in the PowerApp)
  • _label – label that we print, that is going to be a value we pass from PowerApp (ZPLLabelLayout.Text)

All done and now it is time to test it. Open the App and click on the Print button:

ProductLabelPrintingApp

Check Document routing status form:

PowerAppPrint_DocumentRoutingStatus

Let’s check what was printed to the dummy printer:

PowerAppPrint_Printer1PowerAppPrint_Printer2

That is all, with minor changes to MSDyn365FO we have managed to create hassle-free and reliable printing solution. Not bad I would say!

Update inventory batch attributes with a quality test result

Inventory batch attributes allow to capture any additional characteristics against the batch number. The attribute value can be assigned manually, inherited from a component to a finished item or automatically updated on a quality order validation step.

In this post we will review the scenario when we update batch attribute information with the quality test result.

The setup and precondition steps that should be taken are:

1. Create a batch attribute (Product information management > Setup > Categories and attributes > Batch attributes)

PdsBatchAttrib_BatchAttributes

2. Assign the batch attribute to an item (Product information management > Products > Released products, Product specific button on the manage inventory tab)

NOTE: the button is enabled if Batch number is active in tracking dimension group assigned to the item.

PdsBatchAttrib_ReleasedProductsPdsBatchAttrib_ProductSpecific

3. In the Quality test group for the test line select required batch attribute that applies to the test (“Attribute” field) and activate “Update inventory batch attribute” to flag that inventory batch attribute should be updated with result value.

PdsBatchAttrib_TestGroups

NOTE: Update inventory batch attribute field value is defaulted from an Inventory management parameter (Inventory management > Setup > Inventory and warehouse management), but you can always override the value for a particular test group on header on line level.

When all prerequisites are met the next steps for us would be:

4. Create a quality order (manually or automatically by using quality associations). In this example a quality order is automatically created when we posted Product receipt.

PdsBatchAttrib_CreateQO

5. Enter quality test results. Open quality orders form and populate quality test results by clicking on the results button:

PdsBatchAttrib_QOPdsBatchAttrib_QOResults

6. Validate the quality order. Click on the Validate button to validate quality order and quality order test result will be inherited to the inventory batch attribute of the batch number:

PdsBatchAttrib_QOValidate

To check it, open Batches form (Right click > View details or Inventory management > Inquiries and reports > Tracking dimensions > Batches) and click on the Inventory batch attribute button:

PdsBatchAttrib_InventBatchPdsBatchAttrib_InventBatchAttrib

As you can see, system captured not only Attribute value but a quality order number from where the result was inherited which is really handy since it gives us ability to go and check additional test details if required.


TMS: Automatic freight invoice reconciliation

I have a post about inbound load rating that describes how you can apply freight costs manually without using rating functionality in Transportation management (TMS). However, it describes only a part of the process, because after we allocate charges against the shipment we should perform freight invoice reconciliation at some stage.

In standard D365FO we can do reconciliation either manually or automatically (more info here). As you already noticed from the post name, I am going to focus here on automatic reconciliation process.

With this functionality we can define criteria where D365FO automatically matches and approves freight bill and invoice, for example, we can configure the system to do this when we the variance of the invoice amount is less than 10% .

For automatic reconciliation, we must specify the schedule for reconciliation, the invoices and shipping carriers to use (refer to the docs article for step by step description).

I am going to use same flow as in this post to assign charges, therefore I will use same carrier and create additional configuration.

Freight bill type

Here we should specify how freight bills and carrier invoices should be matched, in my setup we are matching by Load id and by Billing group id.

TMSAutoReconciliation_Freight bill type

Freight bill type assignment

This setting maps the bill type with the carrier.

TMSAutoReconciliation_Freight bill type assignments

Audit master

The audit master defines the tolerance limits and how to handle discrepancies.

TMSAutoReconciliation_Audit masters

Then, as a precondition for the freight reconciliation process, we should have a purchase order with a load that has rate assigned.

Create a purchase order, specify shipping carrier information and mode if delivery:

TMSAutoReconciliation_PO

Create a load, rate and confirm it:

TMSAutoReconciliation_Load

If we did everything properly we should see miscellaneous charges assigned to the purchase order lines:

TMSAutoReconciliation_Charge

Also at this stage we should have a freight bill generated:

TMSAutoReconciliation_Load_Freight bill details

TMSAutoReconciliation_Freight bill details

In real life scenario vendor sends us a freight invoice (for example, via email or EDI) which represents a freight bill invoice in D365FO. In the system we can generate it form existing freight bill or create it manually from Freight invoice details form (Transportation management > Inquiries and reports).

In this demonstration, I will generate the freight bill invoice and on this step D365FO prompts me to enter Vendor invoice number:

TMSAutoReconciliation_GenerateFBInvoice

For automatic matching we should enable “Invoice is ready for automatic matching” on the freight invoice detail for the invoce. Here I will also adjust invoice amount to be greather than initial charge value:

TMSAutoReconciliation_FBInvoiceDetails

In addition, we should have two batch jobs running periodically: Auto match batch (performs matching) and Process reviewed matches and reconciliations (approves freight invoices), both can be found under: Transportation management > Freight bills and invoices.

After Auto match batch  finishes, we can see that workflow status for this freight invoice changes to “ReadyToProcess” and  invoice amount is matched with original value.

TMSAutoReconciliation_AutoMatchBatch

When Process reviewed matches and reconciliations batch runs the workflow status automatically changes to Approved (deactivate “Hide approved” to see Approved invoices in the grid). We can also notice that Vendor invoice journals button is enabled now, clicking on it shows the reference to AP journal:

TMSAutoReconciliation_ProcessMatched

TMSAutoReconciliation_APJournal

From the Vendor invoice journal form we can jump to the Journal details:

TMSAutoReconciliation_APJournalDetails

This functionality is relatively new and has powerful features, however, is not well documented and I hope this post will shed some light on it.
Warehouse app. Scan barcodes using device camera.

I have been waiting for this feature for a long time!

Now it is much easier to scan barcodes using warehouse app. In version 1.2.0.0 we can use device camera for a barcode scanning.

Here what you need to setup to make it work:

Firstly, in the Warehouse app field names form set preferred input mode to “Scanning” for required fields:

WHSAPPBarcodeCamera_FieldNames

Then, in the mobile device in the Display settings activate Use camera as scanner:

WHSAPPBarcodeCamera_Use_camera for barcode scanner

All done, try it on any flow you like:

WHSAPPBarcodeCamera_BarcodeScan


I find it very useful, we can use it for demo purposes or in when if RF gun is not available.

For more info refer to the docs article.


Partial location cycle counting

Let’s say that we need to periodically count specific item, in the warehouse this item is stored together with other products. Therefore, we a looking for an option to perform counting of one product ignoring all other stock at location.

So, if you are on July release (7.2) or later version, then you are lucky to have this as part of standard functionality; otherwise you can install KB4025460 “Guided partial location item cycle count where you don’t need to count the full content of location.”

To set this process up we should create work template for cycle counting:

Partial_Location_Counting_Work_Template

On the work template we have “Work line breaks” button where you can specify grouping, i.e. if you want to create cycle counting work for item or product variant. If you need a counting work per product variant then you should choose both options, since AX won’t let you proceed without this setup:

Partial_Location_Counting_Work_Template_Line breaks_message

The setup I did as below:

Partial_Location_Counting_Work_Template_Line breaks

Next step is to create cycle count plan and attach it to the work template that we have just created.

Partial_Location_Counting_CycleCountPlan

And add product variant criteria to the query:

Partial_Location_Counting_CycleCountPlanQuery

Current on-hand information looks as follows:

Partial_Location_Counting_On-hand

Now, after we have processed cycle count template we see that counting work was generated for our product variants ignoring other stock from this location:

Partial_Location_Counting_CCWork

In mobile device menu item setup there is a “Display item number” parameter that you can enable, so users can see on mobile device what item they count.

D365FO: Using Bar codes, External codes and GTIN in Warehouse app to identify an item.

D365FO: Using Bar codes, External codes and GTIN in Warehouse app to identify an item.

In almost every workflow of the warehouse app you will be prompted to enter an item number to proceed further. We can consider options like:

  • Design a label that has AX item number as a barcode that you can scan. However, this will require labeling the stock before you do anything in the system. Moreover, current WHS functionality does not allow you to print labels from AX web client beforehand so it is more likely a change or something that is managed outside of the system.
  • Create new or modify standard receipt list report to contain item number as a barcode that you scan on PO receipt and print label when registering stock on mobile device.

Anyway, none of the above options is great since vendor delivery note usually contains supplier part number, which might not be same as AX item number. If we are talking about food industry, you can get a GS1-128 barcode on a product package that you can use to book stock in.

Let’s review the setup required to achieve this. I will go through few different options that are available out of the box in D365FO Release 7.3.

Firstly, we will create a purchase order and then we will review three different ways how we can receive it on a mobile device using standard “Purchase order item receiving” menu item.

WHSApp_Purchase_order

External item numbers

We can use external item numbers to capture manufacturer item number and then, when receiving PO, on mobile device we can scan manufacturer item id rather than AX item number.

To create External item number for Item go to the purchase tab of the Released product form and create new record.

WHSApp_Rel_product_External items

Since the item number that I am using has Product subtype = Product master I can set required product dimensions for it:

WHSApp_External item

Now we are ready to login on mobile device and perform purchase receipt.

Enter PO number:

WHSApp_ScanPO

Enter External item number into the Item number field:

WHSApp_ScanExtItem

Click OK, gives:

WHSApp_ScanExtItem_Result

As you see from the above screenshot the system, identified AX item number based on external item number value.

Bar codes

We can predefine barcodes for an item in AX that also can be used on receiving flow. Bar codes for an item can be created from Released product form:

WHSApp_Rel_product_Barcodes

Make sure that you activated Scanning field, otherwise Bar code would not be recognized. Product dimensions can be predefined here in case if we are using item with product subtype = Product master.

WHSApp_ItemBarcodes

In the warehouse app we enter Bar code value:

WHSApp_ScanBarcode

Click OK, gives same result, Bar code is automatically replaced with Item number by the app:

WHSApp_ScanBarcode_Result

GTIN codes

Similar to Bar codes, we can create GTIN codes for an item that will be also recognized by warehouse app. To create a GTIN code click on the GTIN code button from the released products form:

WHSApp_Rel_product_GTIN

Do not forget to populate product dimensions for if you are using Product master.

WHSApp_ItemGTIN

Enter GTIN in the warehouse app:

WHSApp_ScanGTIN

Result:

WHSApp_ScanGTIN_Result

As you can see, it is very easy to set it up and it helps a lot during receiving process since it automatically matches Bar code/GTIN or manufacturer item information against AX item code and populates product dimensions based on a setup from release product. Note, there is one more option that I did not cover with the example, it is Product search name field and yes, Warehouse app also accepts it as an input value.

I like it!

D365FO: Manual inbound load rating

I have seen many blogs describing how to setup rating and routing functionality in TMS to calculate charge value and allocate it to the purchase order lines. If you require this functionality then be prepared that it will take some of your time to make it work.

However, what if we have a simple scenario when we do not need to capture rates and routing information and we already know shipping charges. I am thinking about the process when we manually rate inbound load once we receive freight invoice from the vendor and by confirming the load we are allocationg those charges against the purchase lines.

So, what is the minimum setup required to achieve that?

1. Terms of delivery that are used on the purchase order should have enabled “Add transportation charges to the orders”:

TMS_manual_rating_Terms of delivery

2. Shipping carrier used should be active for carrier rating:

TMS_manual_rating_Shipping carrier3. We should have a setup of miscellaneous charge codes for vendors:

TMS_manual_rating_Miscellaneous charges

Now we will create two purchase orders. Make sure that you use items which are enabled for transportation management processes and warehouse is enabled for warehouse management processes.

PO#100:

TMS_manual_rating_PO1

PO#101:

TMS_manual_rating_PO2

NOTE: I have set same terms of delivery and shipping carrier for both orders.

Then, create an inbound load and add to it PO lines from orders created above. We can do it from the Load planning workbench screen (one of the places where you can find it: Warehouse tab on the purchase order form):

TMS_manual_rating_Inbound load

Right, all lines are on the load and now it is time to rate it!

Click Manual rating button on the load for and select rate type and value:

TMS_manual_rating_Route rate details

If you review Route information afterwards, you will see that the load has route with manual rate assigned:

TMS_manual_rating_Routes

To confirm inbound load (and allocate charges) click on the inbound shipment button:

TMS_manual_rating_Confirm shipment

This will change route status to “Confirmed” and allocate miscellaneous charge against all PO lines from the load:

TMS_manual_rating_Routes confirmed

To check the charge, from the purchase order line click Financials > Maintain charges:

TMS_manual_rating_PO line_miscellaneous charge

At that stage, we have following information on the orders:

Purchase order

Item number Quantity

Charge

PO#100

A0001

10

8.75

PO#100

A0002 5 5.84
PO#101 T0100 7

0.41

Total:

15

As you see from above table, the charge is allocated proportionally; there is one more field that was used in charges calculation – Gross weight from the item master, in our example it was:

Item number

Quantity Gross weight

Gross weight x qty

A0001

10 3 30

A0002

5 2

20

T0100 7 0.2

1.4

Total:

51.4

The formula is:

Line Charge = Gross weight * Quantity / Total weight * Total charge = 3 * 10 / 51.4 * 15 = 8.75

In case, if you do not record weight for the item the values would be proportionally allocated across all lines.

Lastly you will need to post freight invoice for this load and you are done.


D365FO: Fulfilment policies

Those of you who have used fulfilment policies in AX may remember that it was available only for sales orders. In last release (Update 7.3) this functionality is expanded and some useful changes are done:

1. Main setup is changed to make all settings consistent. 

In previous versions AR parameters and customer master table had all required fields to define fulfilment rule (on the below screenshot we see customer details information as example).

With this approach when multiple customers had similar settings you still need to configure fulfilment rules separately for every customer. Also there was no visibility in AX on how much variations of fulfilment policy rules are currently used.

Fulfilment policy_Customer_master_old

In new release this part was optimized, new “Fulfilment policies” form has been created under Warehouse management parameters, where we can setup fulfilment policies with different rules. All settings now are in the same place, AR parameters and customer master table were modified to store fulfilment policy value rather than all required field separately. It is much easier now to maintain the setup. Below are the examples of fulfilment policy master table and customer details forms from Update 7.3.

Fulfilment policy master

2. Fulfilment rules and partial TO release become available.

The functionality is now expanded to support transfer orders. In addition to the parameters from p.1 we have new inventory parameter that is used in Transfer order release:

Fulfilment policy_Inventory parameters

Finally, we can define fulfilment rule for transfer orders and partially release it for WHS warehouses.

Fulfilment policy_TO validation

3. Override fulfilment policy at release to warehouse

Now there is an option to override fulfilment order policy when release sales and transfer orders, this is supported from the Release to warehouse form:

Fulfilment policy_WHS release to warehouse

That is all, good to see that with every release AX supports more and more scenarios.

D365FO: Filter codes to restrict products available for customer sale

Product filter codes functionality was introduced in Microsoft Dynamics AX 2012 R3. It can be used to categorize inventory items in the warehouse or restrict product purchase/sale from/to particular vendor/customer.

This post covers setup required to restrict product from a sale to particular customer.

The scenario that I have used in example as follows:

To buy specific product every customer should hold a license. The license is valid for particular period, so it is required to perform license validation whenever you create a sales order and if customer does not have active license we should not be able to sell it.

To make it work in AX, firstly we need to enable Product filters in Warehouse management parameters, i.e. activate “Enable customer filters” parameter.

WHSFilters_WHS_Parameters

There are few options how you can setup filter code validation: on the item group level or item group and filter code combination. This setup is driven from the Item group and if you would like to consider Filter code as additional criteria, then you need to activate “Use filter code” for those product filters.

WHSFilters_Item_Groups

In this example we will setup validation for item group and Filter code 1, i.e. we have all products in one group and filter code will determine whether product is licensed or not.

On the next step we need to create values which we are going to use as a product filter. You can find this option in warehouse management setup. I have created two filter codes: Licensed and Other (i.e. non-licensed).

WHSFilters_Product_Filters

Now we should specify what products should not be restricted from the sale at any time. This can be done in “Generally available products”. On this form we should list Item groups or Item groups with any Filter code combination that do not require Product filters validation.

As you see from the below screenshot all items with Filter code 1 = Other would not be controlled at sale.

WHSFilters_Generally_Available_Items

To complete the setup we need to assign Filter code value to the items in Item group.

I have choose two products from the group and assigned Filter code 1 as “Licensed” for one of them and left another one as available (Filter code 1 = Other).

WHSFilters_Item1WHSFilters_Item2

NOTE: Product filter codes are available only for items that are enabled for advanced warehouse management processes.

To verify the setup we did we should create a sales order and add both items to the sales order lines.

On the below screenshot you see that I have been able to create sales line for item with Filter code 1 = “Other”, but I could not add “Licensed” product to my sales order because of the warning message:

WHSFilters_SO_warning

Let’s try to create filter code for this customer and add this product to the sales line once again.

On the Customers form we have Product filters button under Set up group:

WHSFilters_Customers

On the product filter codes form we need to add a line with required item group and filter code. I will leave Start date/time and End date/time as blank (i.e. no expiration date) but we can used these fields to define period when customer license is valid:

WHSFilters_Customer_Filters

NOTE: Product filter codes can be also specified on a customer group level.

Go back on the sales order and create same line once again. This time it worked:

WHSFilters_SO

That is all, now we cannot sell “licensed” products if customer won’t have product filter code “license” assigned.